Articles by "Do it Yourself"

3D printing Aerodynamic engineering Aeronautical engineering Aeronautical engineering books Airports Architecture Artificial intelligence Automobiles Blast Resistant Design Books Bridges Building Codes Cabin Systems Civil Engineering Codes Concrete Conferences Construction Management Construction Materials Cooling Cryptocurrency Dams Do it Yourself Docks and Harbours Downloads Earthquake Engineering Electronics Engineering Engines Environmental Design & Construction Environmental Engineering Estimation Fluid Mechanics Fluid Mechanics Books Formwork design foundation engineering General Geotech Books Geotechnical Engineering Global Positioning System HVAC Hydraulics Hydraulics Books Hydro Power Hydrology Irrigation Engineering Machinery Magazines Management Books Masonry Mechanical Engineering Mechanics Mechanics Books Miscellaneous Books Modern Steel Construction Nanotechnology Natural Hazards Network Security Engineer Networking Systems News Noise and Attenuation Nuclear Engineering Nuclear Hazards to Buildings Pavement Design Prestressed Concrete Project Management Project Management Books Quantity Survey Quantity Survey Books railways RCC Structural Designing Remote Sensing Remote Sensing and GIS Books Renewable Energy Reports Resume Roads scholarships Smart devices Software Software Engineering Soil Mechanics Solar Energy Special Concrete Spreadsheets Steel Steel Spreadsheets Structural Analyses structures Structures Books Surveying Surveying Books Testing Thermodynamics Thesis Transportation Books Transportation Engineering Tunnel Engineering Wind Energy Zero Energy Buildings
Showing posts with label Do it Yourself. Show all posts

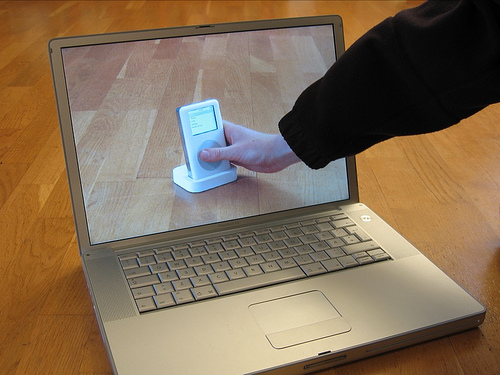
Now here is something cool you will appreciate. These apparently transparent monitors project a clear screen so magnificently that they can be used as a part of a real background. This is all a trick, but tough to achieve the right kind of light and appearance so that the desktop may appear as a part of the scenery.

These samples that we are discussing are are jaw-dropping real, and we haven’t seen anything like them before. But, to do so, the background and the wallpaper/screensaver should completely cover what’s back of the screen to create a lasting effect from a particular angle. Remember that the transparent appearance will be from a particular angle only.

Here is our selection of images. Which one do you like the best?


Here is how such a surreal set of pictures can be taken:
1. Clean up your desktop and set the background shade to green or any other unusual color that won’t hold true with anything else.
2. Set your DSLR and capture the snap of the place and angle where you want to make the laptop appear transparent before.
3. Place your laptop or another screen in place and now take photographs with that ridiculous background color in the desktop of the PC.
4. Open the two pictures in photoshop. Now I get it you know what we need to do here and why we selected that unnatural color for the background. The image on the screen needs to be on top.
5. Go to Select menu and choose Color Range.
7. Now place the eyedropper tool on the green screen, select the entire area of color surrounding it. You might need your photoshop skills to tweak the screen size a bit.
8. Now you can compile the set of these transparent screened laptops and follow a continuously learning process.
 

Glow sticks can light up in the dark and make kids’ parties fun-filled. However, check out the following DIY that will make you use of these glow sticks for something more than just a party accessory. You will require a clear mason jar or bottle for this – make sure that it is clean and nice. Check out the steps below and be sure to let us know what you think of it.

1. Safety first folks; wear gloves when you’re handling chemicals. 


2. Cut open the sticks


3.Let the glowing goo drip into the bottle. 


4.You don’t want it to drip to the bottom only. 

 
5.Make sure that the sides get covered and coated properly. 


6.Let the bottle sit outside or in open area for it to dry.


7.Turn of the lights to check out the bottle light up!


 8.These amazing effects are enough to light up any room

 
Don't forget to share if you enjoyed this post :)

Give Your Dead UPS Battery A Second Life Using This Cheap And Simple Trick

With power crisis becoming an epidemic across the world, frequent power outages are no surprise. Some countries have to go through load shedding for 12-14 hours a day. UPS comes as a savior for the people of these countries as it provides backup power supply when the grid supply goes away.

Give Your Dead UPS Battery A Second Life Using This Cheap And Simple Trick
The main cost involved in running a UPS are the batteries that have to be replaced every 2-3 years. Today, we will reveal you a simple trick that has been used by Geeks for decades to give a second life to batteries.
For this to work, all you need is a pack of Epsom salt and distilled water. Epsom salt is commonly available from any big chemist shop since epsom salt has many cosmetic uses as well. Some chemists call it Magnesium Sulphate so ask for both the names at the chemist.

Once you have these two things, follow the instructions below:
Take 2/3 cup of Epsom salt (MgSO4) and add it into 2 cups of distilled water.
Heat the solution on a stove in a sauce pan till Epsom salt is totally dissolved in the water.
Disconnect and safely remove battery from the UPS.
Wear safety equipment ( Gloves and safety glasses)
Open the filler caps of the battery.
Give Your Dead UPS Battery A Second Life Using This Cheap And Simple Trick

Give Your Dead UPS Battery A Second Life Using This Cheap And Simple TrickAdd an equal amount of the MgSO4/H2O solution into each filler hole of the battery till you have consumed all the solution.
Replace filler caps and put the battery on charging.
Thats it, now you need to wait for a week as the condition of the battery will start to improve by each passing day. The cells will de-sulphate and the battery will start to give better backup time by each passing day. The battery should give best performance in 8-10 days. You can use this trick after every passing year and use your UPS battery for an extra 2 years.
Hope you liked the tutorial. Do try out this cheap and simple trick on your dead batteries and let us know how it went in the comments section below.

In this project we are going to show you how to make a pebble path. We are going to use 100x75 h4 treated tanalised posts for the edgings, gap 20 base course and a choice of a number of topings (pebbles, bark, shell, chip etc.) A pebble path is easier and cheaper to construct than a paving stone path and irregular and curved shapes offer no problem although weeds can be a nuisance and regular raking can sometimes be necessary. For this project we are assuming the ground is moderate to firm, if not, soft ground will need to be excavated deeper and replaced by base course metal. Read at bottom of page for material list and other notes.
 

Step 1:

Excavations Dig out the proposed pathway to a depth of 75mm below finished path height (usually existing ground level) and the required path width.

Step 2:

Putting down the edging. Lay the edge boards (100x75 sawn h4 treared posts) into place so the top of the edge boards are at the required path finished height. Retain them in place with stakes nailed to the outside and trim the stakes off 20mm below the top of the edging board. (see drawing below)

Step 3:

Base course Add a layer of GAP 20 base course in between the edging boards. (GAP 20 is a mixture of rock. The abbreviation, GAP 20, General All Passing, means the metal is graded to one certain size, 20mm in this case, and everything below this size is included in the product). Add and compact the base course with a mechanical plate vibrator until the finished height is 30mm down from the top of the edge boards. At the same time compact the soil against the outside of the edge boards thus ensuring they stay in place parellel. You can hire a plate vibrator from your local hire centre.

Step 4:

Lay pebbles Lay pebbles on top of the base course and flush with the top of the edge boards. Other preferences to pebbles might be garden bark, gravel, shells, white chip etc.

Author Name

Engineeersdaily

Contact Form

Name

Email *

Message *

Powered by Blogger.